Background

Tuesday, March 31, 2015

Baby Girl Handmade Album


Ladies and the occasional gentleman, I give you a work of art.  Brandy was at it again using Mambi's Baby Girl paper pad and some chipboard to create from scratch this lovely mini-album.


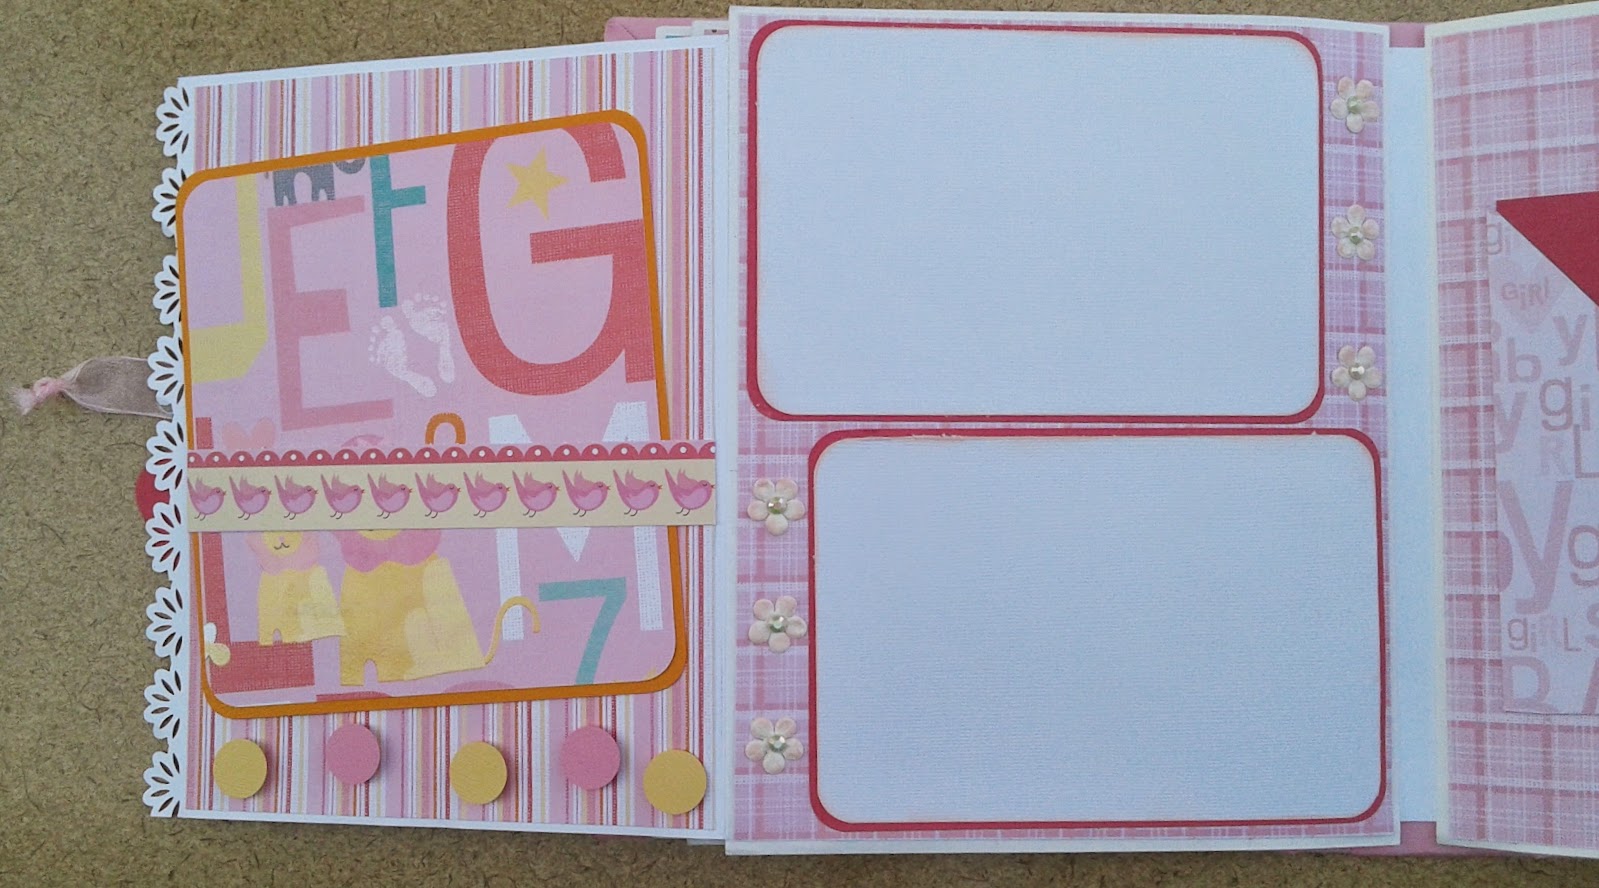
The pages are filled with pockets which hide patterned and cardstock paper mats.  These can be used to adhere photos or other momentos or simply removed to place cards and other memorabilia into the album.


Many of the animal images are die cut layers from Cricut's Create a Critter cart.  Brandy masterfully chose matching cardstock and created these cute creatures which adorn most of the pages.


Most pages fold out to reveal more matted sections for photos, often the images aren't fully glued down so that the photos can be tucked behind the creature.


Many of the word sentiments are epoxy stickers that simply look like they belong on the page.


Many areas are secreted away where the mom or dad can journal and write important memories into the book.


I think this might just be my favorite page.  Not sure if it is the butterflies, those fabulous trees, the tiny flowers, twine or the opposing page with layered cardstock for pictures and journaling.  Simply magnificent.


Tell me that polka dotted elephant isn't the cutest!


The goodness just keeps coming.  A waterfall album at the back just in case you don't have enough room for pictures.


Lovely, don't you think?  Every single time Brandy graces me with a peek at her work I snap photos to share with you.  We've been at this quite a while and her skill is definitely worth sharing with all of you. I hope it inspired and brightened your day.


Sunday, March 29, 2015

A Golden Birthday


I've mentioned before that my family celebrates your golden birthday.  This is the birthday where your age matches the day of the month you were born.  My son, Tim, approached me to make a card for his good friend, Jessica, as she was celebrating her golden birthday.  His actual request was to have me help him make a card.  I guess I was too enthusiastic, because I made this with little help from the man.

Here's the details:

  • The flowers are stamped using my Heartfelt Creations Arianna Blooms.  The gold is embossing powder and the white is white ink.  Both are stamped onto vellum and die cut using the matching dies.  
  • The butterfly is made the same with my Prickly Pear Mini-Butterflies stamp and die set.     
  • The leaf was die cut using my Heartfelt Creations Classic Leaf die which I then pressed into my embossing ink pad and heat embossed several layers of gold embossing powder.  I did this by sprinkling the first layer on the wet embossing ink and then heated to melt the powder.  While the powder was still wet, I pressed the image into the leftover powder on my workbench.  Powder clings to the hot image and I heated it up again.  There is probably 4 layers of embossing powder on this image.  The image tends to get very warm, so do this carefully!
  • I gold embossed the swirl pattern onto the kraft paper that I had applied white ink to with a dauber.  I first inked through a stencil, but the shape was all wrong so I just kept rubbing the image, smearing the color until it became nondescript.  I also embossed the swirl 2 or 3 times to make the image more shiny and thicker.
  • The edges of the kraft paper were embossed by rubbing the edge on my embossing ink pad and sprinkling with gold embossing powder.  I repeated this layer 3 or 4 times and am really pleased with the final look.
  • The sentiment was printed out using my computer and printer at home.


I stamped and embossed more gold on the inside.  After my son shyly grinned when I showed him the card, he produced two boxes and asked me to wrap his gifts to Jessica as well.  What is a mom to do?  Certainly the days of asking for my help are limited, so I wrapped them up with some more shiny gold ribbon.  Needless to say, I receive a smiling thank you as he whisked them away, rushing out the door to go to dinner to celebrate.

I'm going to enter this card in the following challenges:

Inspiration Journal's Spring Blooms, what's more spring that butterflies and flowers?

Simon Says Stamp's Wednesday Challenge: Simon Says Anything Goes

and Word Art Wednesday's Challenge #176 Anything Goes


Monday, March 23, 2015

Day 2 Stretch Your Dies - Using Larger Die with Dies Cuts


This day we learned how to think about our larger frame dies in a different way.  One technique was to use a larger die to cut multiple smaller die cuts into a shape for the front of a card.  For my card, I die cut Heartfelt Creations Butterfly Medley die using patterned paper.  I arranged the butterflies and some small white embossed flowers (made out of vellum) on my work surface to fill the flower shape I could cut.  I place transfer tape (sticky side covering the die cuts) over the die cuts and then cut my larger wavy circle.  It is hard to see the original shape of the larger die, but is was almost a very large flower- wavy in a symmetrical way.

I cut the sentiment using a Penny Black Words of Gratitude die out of patterned paper and covered with Crystal Accents to create my own epoxy sticker.  I really like how this turned out and may use this technique again and again.

I'm going to enter this card in the following challenges:

Challenge #175: Anything Goes

Simon Says Spring Pinterest Inspiration Challenge - I used the colors in one of the photos (soft pinks and greens) to inspire this card.

Inspiration Emporium's Spring Blooms Challenge

Come on over and join the fun.


Sunday, March 22, 2015

Day 1- Stretch Your Dies Online Card Class - Heat Shrink Craft Foam


I've had a very busy week with a trip to California crammed in for work.  I signed up for the Stretch Your Dies Online Card Class and found it to be, once again, the busiest week to have homework.  I've tried to catch up this weekend, but find that I am woefully behind.  This card was created using a technique taught on Monday- die cutting with craft foam.  Each embellishment except the purple border was cut from craft foam.  The Hello die is a Paper Smooches die, the flowers are Heartfelt Creations Asters and the leaves come from a Spellbinders set.  I cut everything out of white foam and shrunk them with a heat tool.  I used my distress inks (Shaded Lilac, Shabby Shutters and Seedless Preserves) to color the images.  There is quite a bit of dimension on this card and I'll admit to being skeptical of the technique.  i thought it might look cheesy.

Well, it doesn't.  It is unique and different and though I might not use it on a lot of cards truly represents a reason to take an online card class.  I find plenty of technique videos for free online and I can follow those instructions.  However, I find myself watching the same kinds of videos over and over and using the same kinds of techniques.  This card is an example of how I can spice up my mojo by stretching a bit.

It's not too late to join the class, just click the link to sign up.  Maybe I'll see you over there as I catch up on my homework.

I'm entering this card in the following challenges:

Challenge #175: Anything Goes

Simon Says Spring Pinterest Inspiration Challenge - I used the colors in one of the photos (purple and green) to inspire this card.

Inspiration Emporium's Spring Blooms challenge

Come join the fun or just look at all the inspiration.


Thursday, March 19, 2015

Card Gift Box


I'm going to admit to really loving how this turned out.  I used up a bunch of paper that has been in the stash for a decade (that red and blue flower is AT LEAST 10 years old).. I think the container a perfect match to my chalkboard card set.  I used a similar concept to the folios that Brandy has been making- layering paper over chipboard and made the card holding envelope using portions of the technique described here.

The lace was cut using my Our Daily Bread Designs Beautiful Borders die.  It really works well on the project.


I don't own the Heartfelt Creations Majestic Blooms stamp and die but got these from working their booth last year.  I colored them with Faded Jeans and Fired Brick Distress inks with a little Good Earth Elements in the center.  The medallion die cut is an old Spellbinders die, stamped sentiment tag and a little twine to finish is off.


I'm saving this for a gift to give I think it is a quite a nice package- no wrapping on this one.  Overall, I had a lot of fun with my Our Daily Bread Designs chalkboard stamps and really liked using up some of those papers that have been around a while.


Tuesday, March 17, 2015

Chalkboard Hymns- I'm telling you this was fun!


I picked up a couple of Our Daily Bread Designs Chalkboard Hymns stamps at the rubber stamp convention last fall.  I know- the same convention I worked last weekend!  Well, I think the return of the convention worked in my favor because I finally watched the video they have which discusses how to use these stamps and I decided to play around.


Once I got going, I just couldn't stop.  The added pieces are mostly cut using my Heartfelt Creations Arianna Lace die, Heartfelt Creations Posy stamp and die with a few of my Prickly Pear Mini Butterflies die cuts to add to the cards.  Strap in, it is going to be a picture heavy ride for a couple of minutes.  I ended up making about 18 of these beauties from various patterned papers in the stash- so old I can't even tell you when or where I got them.


Prickly Pear mini-butterflies.  I just love them!

So, I made so many of these cards trying to get the chalkboard technique down that I had to put some together in a card set to give as a gift.  I'm still working the design out, but will post that later when I got the project done and pictures made.


Saturday, March 14, 2015

Celebrating Another Milestone Birthday- 70 Years Young


The ever elusive Man Card.  I make quite a big deal about it on this blog.  I think it is my own mental block.  Then my mom asked for help making a card for a gentleman who had a milestone birthday.  I scrounged through the stack of scraps (why, why, WHY?  I have more than enough paper in the first originals...) and whipped up this hearty card (isn't that a good adjective to describe the man card?

The green polka dots are a little girly and the brown swirl at the top might be sending it a little over the edge- but I think it works.

On the inside- a small stripe.  Well, that strengthened it up a bit, don't you think?!

I've entered this card into Simon Says Stamp's B is for... challenge.  My B is for blue and birthdays.  I've also linked up with Word Art Wednesday's Challenge #174: Anything Goes.  Come join the fun.


Wednesday, March 11, 2015

Belated Birthday Wishes!


I told you that Brandy and I recently got together to celebrate birthdays- mine late and hers slightly early.  Well, this is the lovely gift that I received from the immensely talented Brandy.

The tag was all handmade by Brandy using a watercolor technique.  The stamps were inked with Distress Ink and then a brush and water used to blend and shape the flower, adding some green to the flower and then creating leaves on the card.  Antique Linen Distress Ink was used to create the background on the tag which was finished with a black Archival Ink sentiment.


Not to be outdone by the tag, I also received this beautiful card with Distress Ink coloring of a Gorjuss stamp image.  There is glitter on this image along with my favorite color, green, in all the glorious Distress Ink colors.  The picture doesn't even come close to the finished result, ladies!

Please join me in marveling at my bestie.  I felt so special and loved with the care and beauty she graced me with.  My card is pinned up at work so that I might not forget I'm cared for.